As far as the math is concerned, this one is very boring. It's just addition. I justify this, however, with the notion that the endings of trilogies are more about explosions and special effects than elegance or cleverness. Our standard paper box does not require the unreasonable dimensions (2L+2W+1) of the beloved paper bag; nor does it require the precision or angle measurements of the crafty envelope. This post is one for the masses.
We will do this in centimeters, for switching to inches at this point would be insane. Also, as previously mentioned, I invested in a scoring board in centimeters because coolness radiates from my core. Your box is made of two movable parts called a bottom and a top, each of which has three dimensions. Let L, W, and H represent bottom length, bottom width, and bottom height. You may choose the top height, T, of your box, as long as 1 ≤ T ≤ H. Anything else would be at your own risk.
You will need:
1. A piece of cardstock of dimensions (L+2H) by (W+2H) for the bottom
2. A piece of cardstock of dimensions (L+2T+1/4) by (W+2T+1/4) for the top
3. A ruler, a pencil for lightly marking measurements, and a blunt pointy object for creasing
OR a paper scoring board
4. Some form of adhesive (dry adhesives like double sided adhesive or glue dots recommended)
Optional materials include:
1. A paper cutting device (paper cutter, scissors, craft knife, etc.)
2. A thin cardboard or cardstock insert of dimensions L by W
3. Ribbons, gifting tags, or other decorations
4. A bone folder, if you're feeling extra fancy


Step 1.1:
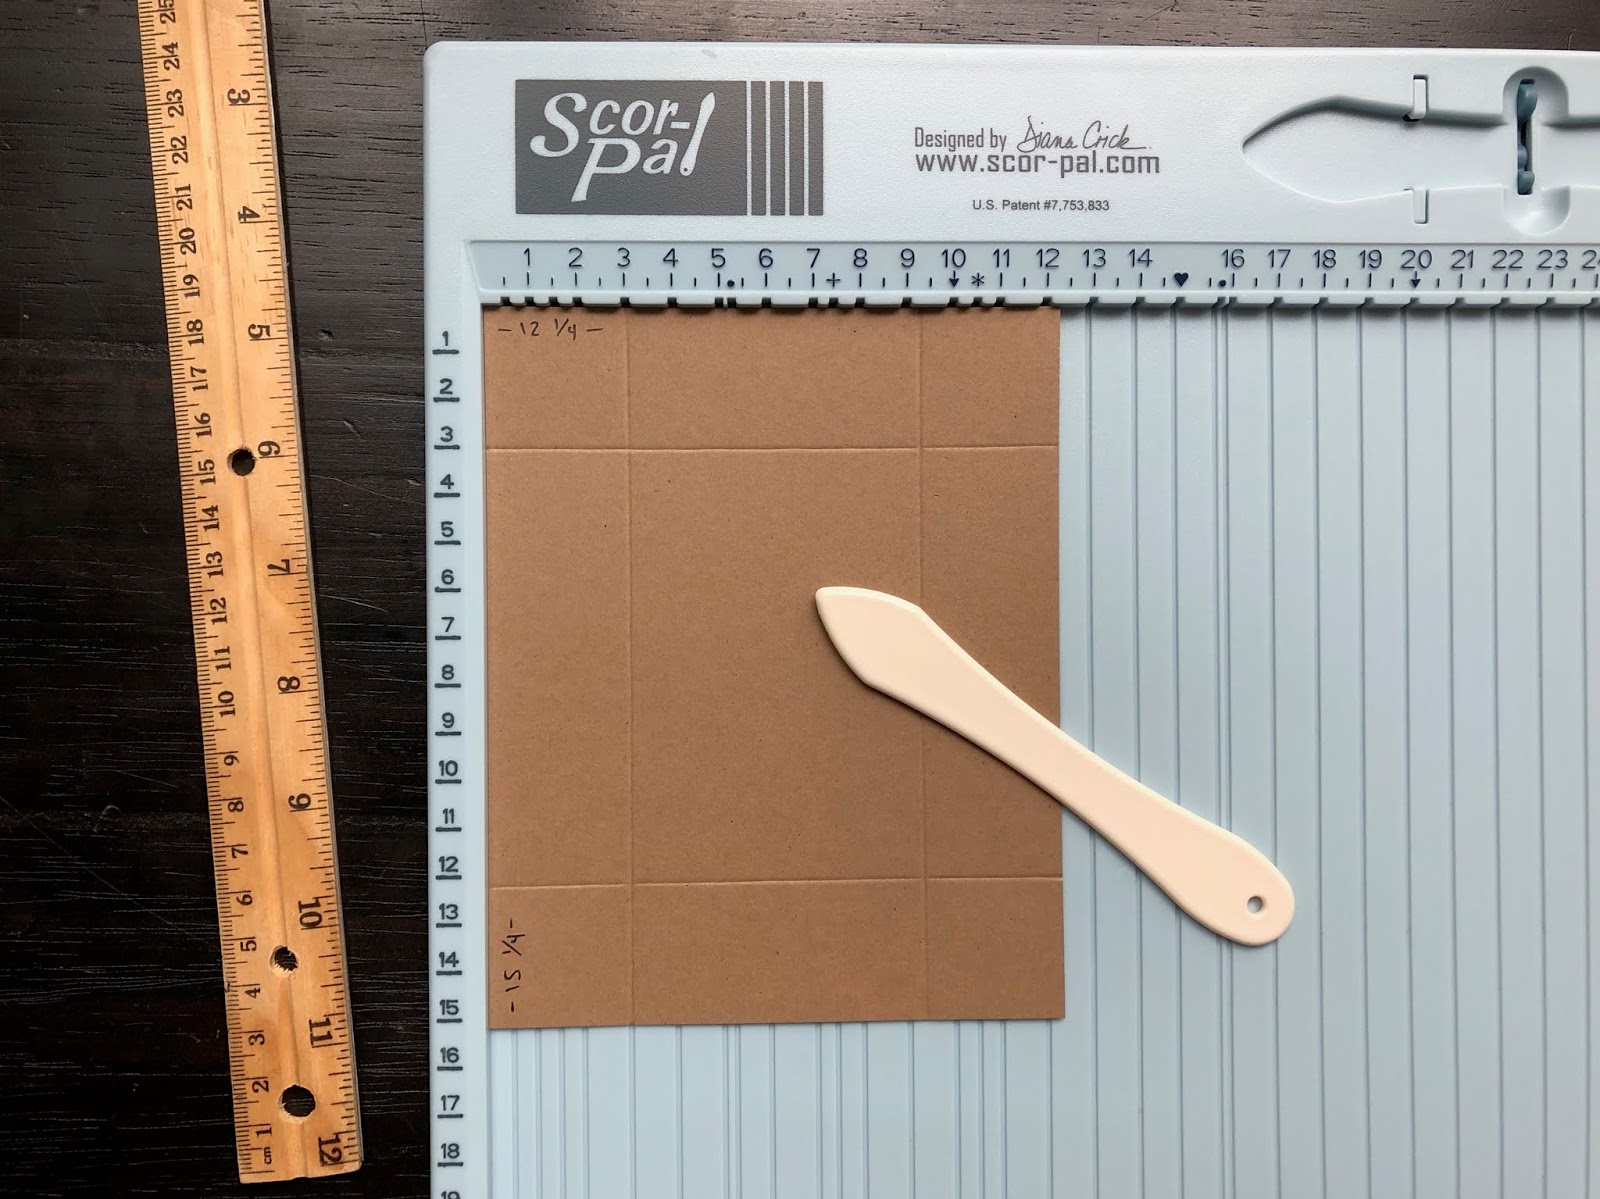
Starting with the first piece of cardstock, score a distance of H from each edge of the rectangle.


Step 1.2:
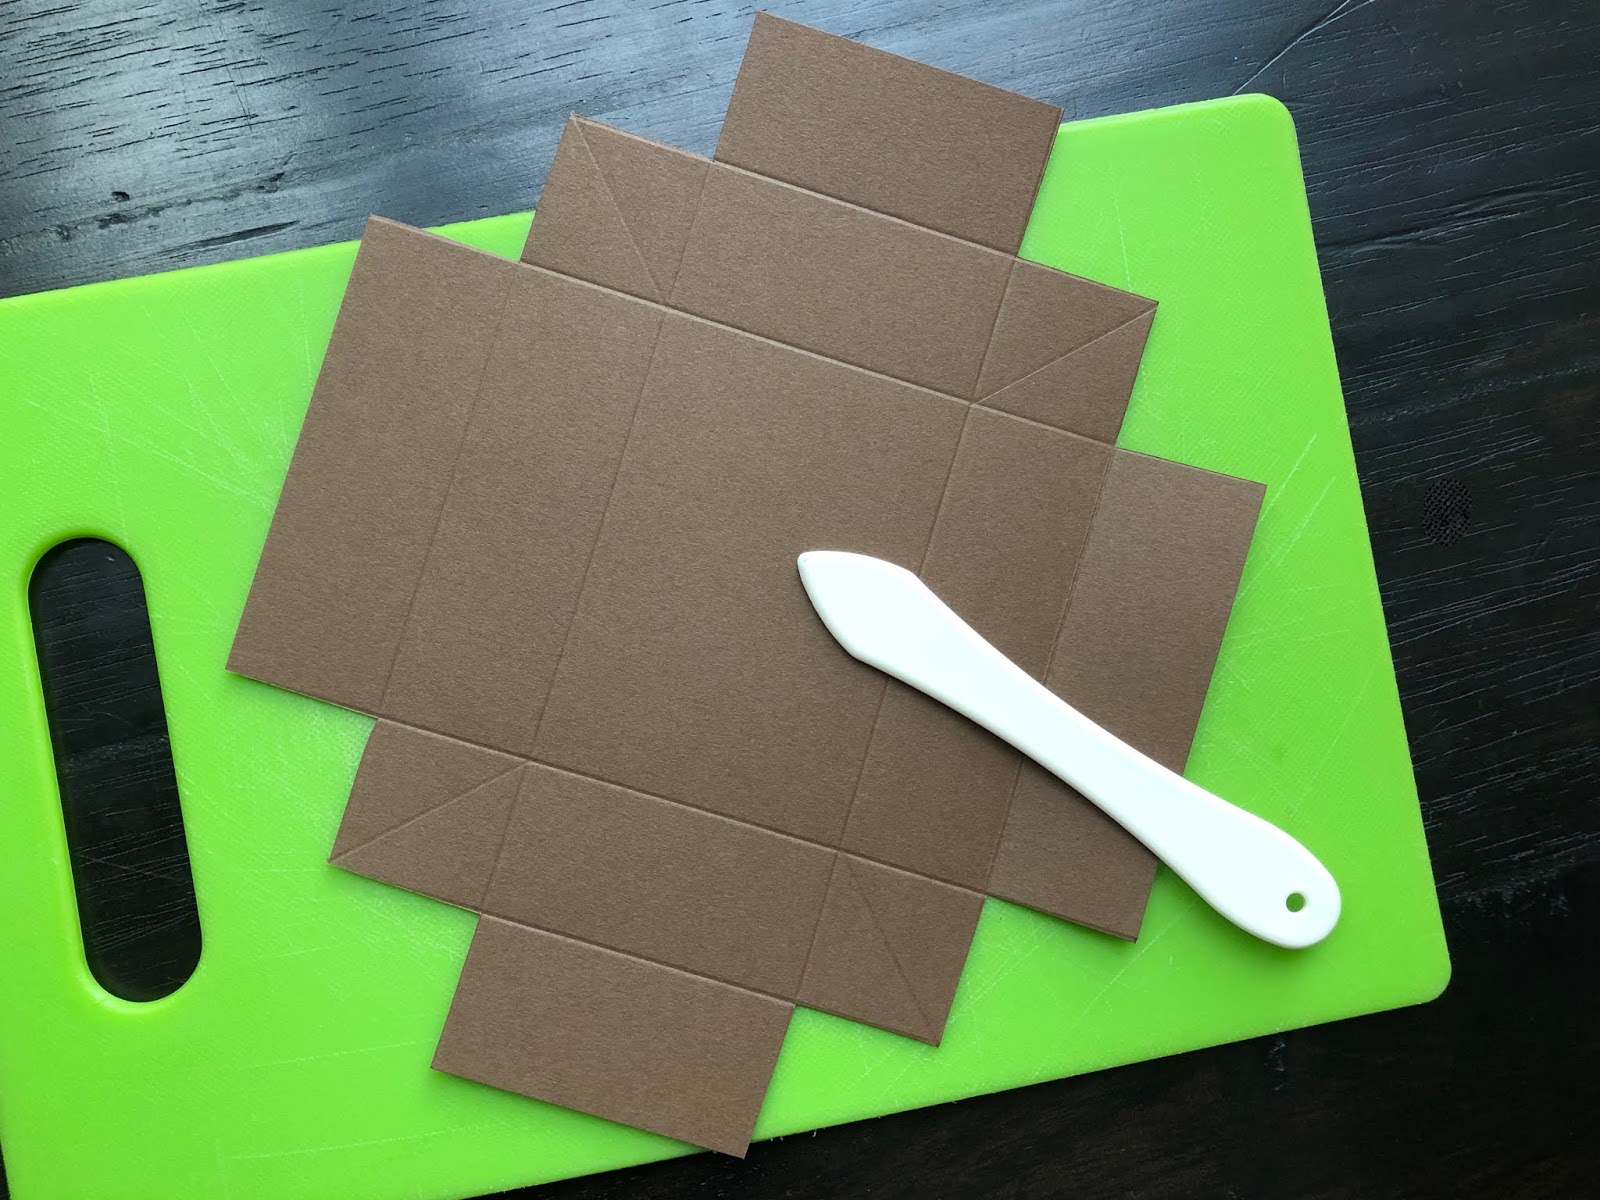
This scoring has created four squares along the corners. Score each of these squares along the diagonals that lead to the corners of your cardstock.

Step 1.3:
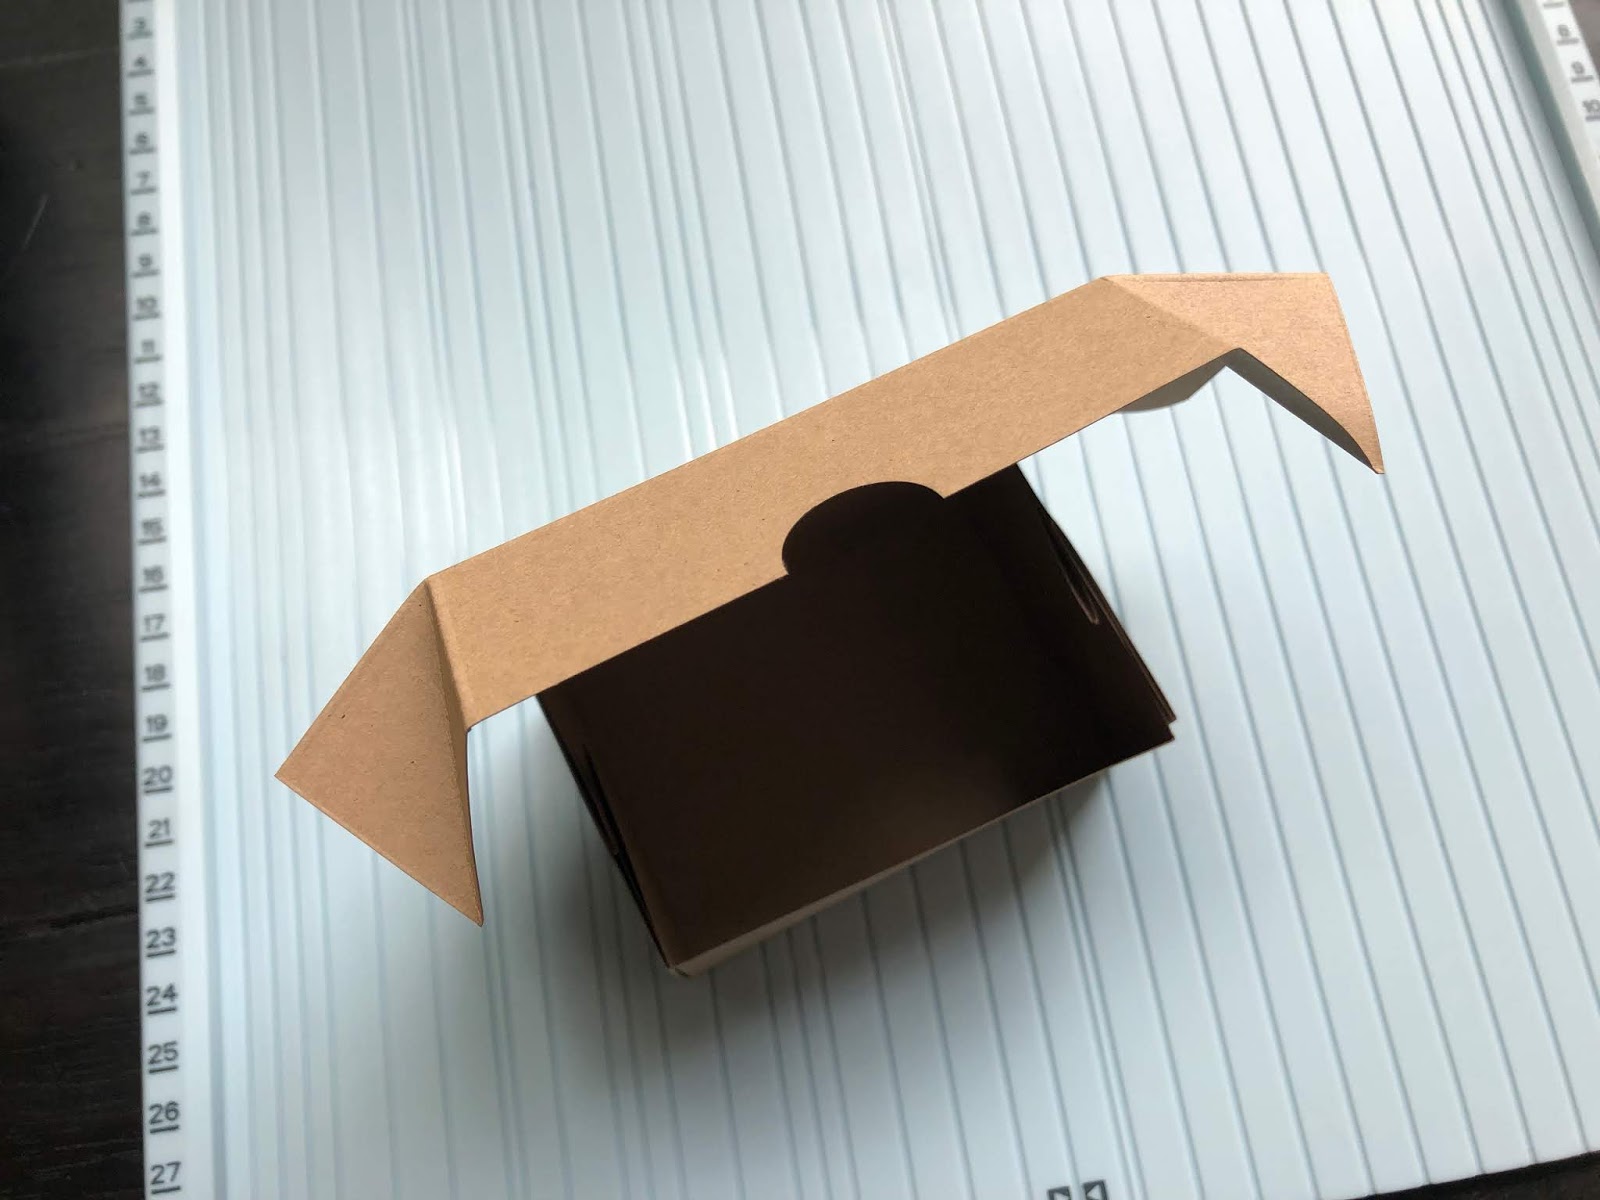
Fold into a box, creating four inward triangular flaps. I recommend sealing these triangles to themselves with one strip of adhesive along the side creating each corner of the box, and sealing the triangles to the inside of the box with another strip of adhesive along the hypotenuses. I also recommend adhering the triangles to the shorter sides of the box, W, but the world is your oyster.


Step 1.4:
It is now time to create a lid. I am sure it is obvious, but disregarding the difference in height, your second piece of cardstock is a quarter of a centimeter larger in both dimensions, so it will fit around your bottom box. Score a distance of T from each edge and complete.


Step 2.1:
But what if you are either wealthy in large pieces of cardstock or making a very small box? In these cases, you might want extra flaps to fold down into the sides of your box, which create a folded seam, hide your triangles, and add rigidity. With three arguments behind such a maneuver, the rewards clearly outweigh the effort. Simply measure your pieces of cardstock to (L+4H) by (W+4H) and (L+4T+1/4) by (W+4T+1/4). While you're at it, make sure you have an L by W insert ready to line the bottom of your box, as reinforcing only the sides of a paper box shows irresponsibility.

Step 2.2:
With your first piece of cardstock, you will score H from each edge not once, but twice (2H). After all, you're a professional.

Step 2.3:
Remove the four L-shapes in the corners. The rest of this is so routine that I am moving onto our next discussion.


Step 3.1:
It is possible that you have a circle punch, and one of the joys of owning a circle punch is creating semi-circles on paper edges, also known as thumbholes for boxes. Thumbholes are in all playing card boxes, so if you don't know what I'm talking about, look at one. If you were to place thumbholes in your top box, the recipient of such a present would smile, but without authenticity. For authentic thumbhole smiles, it is necessary to create attached lids. You will need a piece of cardstock of dimensions (2W+2H+T+1/8) by (L+2H+1/4).

Step 3.2:
From one side of the (2W+2H+T+1/8) edge, score H, then (H+W), then (2H+W). This is the outline to the bottom of your box.


Step 3.3:
From both sides of the (L+2H+1/4) edge, score (H+1/8) up to the (2H+W) mark. Trim 1/8 off the sides you just scored. These are edges for the bottom part of your box.


Step 3.4:
Cut along both sides of the (2H+W) mark until you get to the (H+1/8) marks.

Step 3.5:
For the remainder of the (2W+2H+T+1/8) edge, trim (H-T) from both sides.
Notice that you can skip this step if you chose T=H. Also, if (H-T) ≥ 1/8, you could start with cardstock dimensions (2W+2H+T+1/8) by (L+2H) instead of (2W+2H+T+1/8) by (L+2H+1/4).
(See conclusion for more details.)

Step 3.6:
Score T from all 3 sides of your top. Finish assembling and punch the thumbhole.
To make this box open more widely, simply skip using adhesive on the two joints connecting the box to its lid.


Step 4.1:
It would be so much nicer if the thumbhole went through two sheets, because that makes it easier to grab, so perhaps we should apply flaps to the attached box. In this case, we would start with cardstock of dimensions (2W+3H+2T+1/8) by (L+4H+1/4). Furthermore, if you remember our talk about responsibility, you also know you'll need an insert of dimensions (L) by (2W+H). This is the fourth time we're building the same box, and the time has come for me to release you from under my wing. No more writing. Fly, my little chickadees.


Step 5.1:
It's possible you'd want to create an attached lid that is smaller instead of larger than the bottom box. In this case, your top box would tuck in, and your thumbhole would be in the middle of the bottom box side, L by H. An advantage to this style is the option to break the top sides into three flaps (with or without decoratively trimmed corners) that adhere with less friction, which is useful when the contents of your box are a cupcake with a swirl of icing that is not to be jostled. Here's one with folded flaps in bright green for two mini margarita cakes with lime buttercream, not to be jostled.


In conclusion, folded flaps like boxes 2, 4, and 5 create a smoother finish, rely less heavily on adhesive, and are necessary when the cardstock is thin. Boxes 1 and 3 are much more paper efficient. My personal favorite is box 3 with very thick cardstock, and now that we all know how to do it even when T=H, I'll write shorthand directions for box 3 where T = H-1/8. Obviously, you can also adjust the measurement "1/8" depending on the thickness of your material and by how tightly you would like your lid to fit.
Cut your cardstock to (2W+3H) by (L+2H).
Line (2W+3H) up to the top of your score board.
From the left, score H, then W from there, then H from there. From the right, score H-1/8.
Rotate the paper 90° counterclockwise so the bottom of your box is towards you.
From both the left and right sides, score H from the bottom edge up to the HWH line.
From both the left and right sides, score H-1/8 from the top edge down to the HWH line.
From both the left and right sides, cut a distance of H along the HWH line.
For the top part, I'd recommend a thumbhole centered in L and rounded corners in the back.

The whole time I was working on this, Milli made one too, and there's a lot of glue under the tape. She's amazing.


Step 4.1:
It would be so much nicer if the thumbhole went through two sheets, because that makes it easier to grab, so perhaps we should apply flaps to the attached box. In this case, we would start with cardstock of dimensions (2W+3H+2T+1/8) by (L+4H+1/4). Furthermore, if you remember our talk about responsibility, you also know you'll need an insert of dimensions (L) by (2W+H). This is the fourth time we're building the same box, and the time has come for me to release you from under my wing. No more writing. Fly, my little chickadees.


Step 5.1:
It's possible you'd want to create an attached lid that is smaller instead of larger than the bottom box. In this case, your top box would tuck in, and your thumbhole would be in the middle of the bottom box side, L by H. An advantage to this style is the option to break the top sides into three flaps (with or without decoratively trimmed corners) that adhere with less friction, which is useful when the contents of your box are a cupcake with a swirl of icing that is not to be jostled. Here's one with folded flaps in bright green for two mini margarita cakes with lime buttercream, not to be jostled.


For unattached top flaps, remove squares of length 2T from the top corners
instead of the usual L-shapes, which are pictured.


Boxes 1, 2, 3, 4, and 5
In conclusion, folded flaps like boxes 2, 4, and 5 create a smoother finish, rely less heavily on adhesive, and are necessary when the cardstock is thin. Boxes 1 and 3 are much more paper efficient. My personal favorite is box 3 with very thick cardstock, and now that we all know how to do it even when T=H, I'll write shorthand directions for box 3 where T = H-1/8. Obviously, you can also adjust the measurement "1/8" depending on the thickness of your material and by how tightly you would like your lid to fit.
Cut your cardstock to (2W+3H) by (L+2H).
Line (2W+3H) up to the top of your score board.
From the left, score H, then W from there, then H from there. From the right, score H-1/8.
Rotate the paper 90° counterclockwise so the bottom of your box is towards you.
From both the left and right sides, score H from the bottom edge up to the HWH line.
From both the left and right sides, score H-1/8 from the top edge down to the HWH line.
From both the left and right sides, cut a distance of H along the HWH line.
For the top part, I'd recommend a thumbhole centered in L and rounded corners in the back.

So easy and so fast
The whole time I was working on this, Milli made one too, and there's a lot of glue under the tape. She's amazing.

Boxes 1, 2, 3, 4, 5, and 6
No comments:
Post a Comment