Now Milli's birthday is coming up, and she wants sugar cookies. This time, I've wisened up. This time, I'm being meticulous. Gone are the days when I thought I'd make some cookies and icing and somehow get by respectably. Now I know better.
This is my first plan. This post is a tutorial on how to create two dozen similar four by four inch Ann Clark pumpkin cookie cutter sharp-edged lavender sugar cookies with an original design in lemon royal icing. Hopefully I will never write a post anything like this again. I expect my second plan will happen naturally, sort of like what I assume happens during most people's first plans.
Some Common Sense I'm Missing:
Allow several hours for cookie decorating and crusting.
Scoop (don't pour) powdered sugar to avoid getting it everywhere.
Silicone bottle screw pieces must be clean, dry, and perfectly secure before using.
Decorating:
Common tools are piping bags, parchment cones, and plastic or silicone bottles.
Decorating can be done with no tips, plastic tips, or metal tips.
If using no tips and plastic bags, cut opening across the seam to lessen a seam point.
For tips sized 0 or 00, consider straining royal icing through fine mesh like unworn pantyhose.
For smooth outlining, tip should be lifted off cookie, touching down only to start or break flow.
For flooding, tip should be touching cookie and various pressures can be used.
Flooding icing still requires careful piping and spreading with a toothpick or scribe tool.
Thicker icing needs to be piped more slowly so it doesn't break.
Colors:
Never use watery food coloring, only gel food coloring.
Consistencies are everything. Thicker icing is better for maintaining shape and drying quickly, and thinner icing is better for drying flat and creating flush "wet on wet" designs. Royal icing consistency is described by the number of seconds it takes the icing to smooth over after a disruption. Normally, a cut is made with a spatula or a knife across the surface of the icing in order to time its disappearance. As a thinner icing smooths over more quickly, it follows that thin icings have smaller numbers and vice versa. The most popular numbers used to describe royal icing consistency are 5, 10, 15, 20, and 25, but 4, 12, and 30 have a place in this discussion. Any less than 4 seconds will not dry well and is considered unusable.


Pipe section 3 from the middle diagram and smooth with the scribe tool.
Colors:
Never use watery food coloring, only gel food coloring.
The three biggest brands are Chefmaster, Americolor, and Wilton.
For an extra crisp white, add white coloring gel.
White royal icing will be off-white the next day as air bubbles escape.
All royal icing darkens over time.
Mix colors into thicker icing before thinning for even color distribution.
Dull icing is a result of over-mixing the original batch.
Red and black stain easily and have the most trouble mixing and drying properly.
Red and black also sometimes smell like permanent markers and taste bad.
Dull icing is a result of over-mixing the original batch.
Red and black stain easily and have the most trouble mixing and drying properly.
Red and black also sometimes smell like permanent markers and taste bad.
Red and black need to be made ahead of time to darken for at least a day.
"Super red" and "super black" colors are sold to aid with saturation.
If making black, it is helpful to start with leftover dyed icing instead of white.
It is also possible to add cocoa or charcoal powder to help darken black icing.
Ingredients:
Pasteurized egg whites or meringue powder both work.
It is also possible to add cocoa or charcoal powder to help darken black icing.
Ingredients:
Pasteurized egg whites or meringue powder both work.
For each two pound bag of sugar, use five whites and a half teaspoon of cream of tartar.
Alternatively, this is ten teaspoons of meringue powder hydrated with ten tablespoons of water.
Water can be replaced with any liquid that is fat free and acidic like coffee, tea, or juices.
One full bag of powdered sugar makes about six cups of royal icing.
Extracts must be oil free, which is harder than it sounds.
Cream of tartar and/or lemon juice can keep icing from becoming grainy.
Glycerin prevents the icing from drying very hard.
Drying:
Allow eight hours of drying time.
The faster the icing dries, the smoother the surface.
Avoid drying on stacked cooling racks and allow cookies plenty of breathing room.
For the shiniest finish, dry cookies in front of a fan for the first hour or use a dehydrator.
Extracts must be oil free, which is harder than it sounds.
Cream of tartar and/or lemon juice can keep icing from becoming grainy.
Glycerin prevents the icing from drying very hard.
Drying:
Allow eight hours of drying time.
The faster the icing dries, the smoother the surface.
Avoid drying on stacked cooling racks and allow cookies plenty of breathing room.
For the shiniest finish, dry cookies in front of a fan for the first hour or use a dehydrator.
Dehydrators can also help to set layers quickly in multi-layer designs.
Dehydrators should be at 95 (and no more 105).
Most layers require about fifteen minutes, and flood layers can require up to twenty.
Quick setting with a dehydrator maintains royal icing shape and keeps puffy icing puffier.
With a dehydrator, large, under-baked, or high-moisture cookies can ripple or crack more easily.
After dehydrating to set the crust, it's still necessary to fully air dry for the 8 or so hours.
Storing:
Store covered at room temperature for up to ten days.
Separation of water and icing is normal - just stir well.
Storing:
Store covered at room temperature for up to ten days.
Separation of water and icing is normal - just stir well.
Always double check consistency; as air escapes, icing can thin.
If freezing for up to three months, cover with plastic wrap on all sides.
Thinning:
Making royal icing is easy; thinning it out is not.
Some people use spray bottles, which emit 1/40 to 1/8 of a teaspoon at a time.
If icing has gotten too thin, add more stiff icing.
If freezing for up to three months, cover with plastic wrap on all sides.
Thinning:
Making royal icing is easy; thinning it out is not.
Some people use spray bottles, which emit 1/40 to 1/8 of a teaspoon at a time.
If icing has gotten too thin, add more stiff icing.
It is also possible to thicken with sifted powdered sugar if in a pinch.
All royal icing gets looser over time as air bubbles escape.
Consistencies are everything. Thicker icing is better for maintaining shape and drying quickly, and thinner icing is better for drying flat and creating flush "wet on wet" designs. Royal icing consistency is described by the number of seconds it takes the icing to smooth over after a disruption. Normally, a cut is made with a spatula or a knife across the surface of the icing in order to time its disappearance. As a thinner icing smooths over more quickly, it follows that thin icings have smaller numbers and vice versa. The most popular numbers used to describe royal icing consistency are 5, 10, 15, 20, and 25, but 4, 12, and 30 have a place in this discussion. Any less than 4 seconds will not dry well and is considered unusable.
Cookie decorators say that "each decorator has their preferred consistencies," but I think there's a lot more to it than that. In truth, they're all being very annoying. Most obviously, they don't use timers and they count at different speeds. If you're not already annoyed, some of them wait until the line completely disappears and some wait until the line mostly disappears. If you're not annoyed by now, you have no place reading this blog. Get out!
To add to the confusion, decorators that use very small piping tips require looser, flowier icings, and with the shorter height from those pipings, their designs will indeed spread less. It's not like those decorators just prefer looser icing; their tools require it. Anyway, I'm a novice, and my silicone bottle tips are pretty large (I'm guessing the equivalent of a Wilton #2 and a #4), so I'll need thicker icing than those kinds of cookie decorators. My chart will include how many teaspoons of water per cup of stiff icing cookie legend Julia Usher uses, and for what purposes.
To add to the confusion, decorators that use very small piping tips require looser, flowier icings, and with the shorter height from those pipings, their designs will indeed spread less. It's not like those decorators just prefer looser icing; their tools require it. Anyway, I'm a novice, and my silicone bottle tips are pretty large (I'm guessing the equivalent of a Wilton #2 and a #4), so I'll need thicker icing than those kinds of cookie decorators. My chart will include how many teaspoons of water per cup of stiff icing cookie legend Julia Usher uses, and for what purposes.
Now that that's out of the way, we shall begin our tutorial.
First, make one batch of sharp-edged sugar cookie dough.
To do this, you'll need to set out two sticks of butter to soften, and while you're at it, blend a tablespoon of culinary lavender with your eggs. It will be a frothy (and unsavory) mess, but it will settle down by the time your butter is soft. Whenever it's ready, get that sticky dough in the fridge to firm up.
Next, make a double batch of royal icing. This will yield six cups at about 200 g per cup, which is too much, but you need too much when you're following a plan. This is a tutorial on how to make a matching set of two dozen cookies, not a tutorial on life without insurance. You can always make more cookies later.
As soon as it's ready, set aside 700 g of stiff icing, and divide the remainder into five batches of 100 g each. Store in glass containers with lids.
Once your dough has chilled, it's time to bake. You will need your dough, a pumpkin cookie cutter, a rolling mat, extra flour, a rolling pin, two baking trays, three silpats, a large cutting board, a plate, and wire cooling racks.
This dough gets very soft at room temperature, so working quickly and using flour as needed, roll half the dough out to 4 mm or 1/6 inch. You should be able to get 8 pumpkins from this. Place 6 of them on a silpat-lined baking tray and the remaining 2 on a silpat-lined cutting board. Chill both in the fridge and preheat the oven to 350. Sprinkle the plate with flour, shape the leftover warm dough into a disc, and chill in the freezer.
First, make one batch of sharp-edged sugar cookie dough.
To do this, you'll need to set out two sticks of butter to soften, and while you're at it, blend a tablespoon of culinary lavender with your eggs. It will be a frothy (and unsavory) mess, but it will settle down by the time your butter is soft. Whenever it's ready, get that sticky dough in the fridge to firm up.
Next, make a double batch of royal icing. This will yield six cups at about 200 g per cup, which is too much, but you need too much when you're following a plan. This is a tutorial on how to make a matching set of two dozen cookies, not a tutorial on life without insurance. You can always make more cookies later.
As soon as it's ready, set aside 700 g of stiff icing, and divide the remainder into five batches of 100 g each. Store in glass containers with lids.
Once your dough has chilled, it's time to bake. You will need your dough, a pumpkin cookie cutter, a rolling mat, extra flour, a rolling pin, two baking trays, three silpats, a large cutting board, a plate, and wire cooling racks.
This dough gets very soft at room temperature, so working quickly and using flour as needed, roll half the dough out to 4 mm or 1/6 inch. You should be able to get 8 pumpkins from this. Place 6 of them on a silpat-lined baking tray and the remaining 2 on a silpat-lined cutting board. Chill both in the fridge and preheat the oven to 350. Sprinkle the plate with flour, shape the leftover warm dough into a disc, and chill in the freezer.
(If this hasn't gone to plan, it's possible to roll the dough out and then freeze it. Cutting the cookies and transferring them to the silpat has never been easier.)
Because these cookies are large, they'll need around 14 minutes of baking time. Bake the first tray of 6 pumpkin cookies and let them rest for at least 5 minutes on the baking tray before transferring them to a cooling rack.
While the first tray is baking and cooling, remove the second half of the cookie dough from the fridge and create a second silpat-lined tray of 6 cookies with 2 more for the cutting board. Gather the leftover dough and add it to the plate in the freezer. Bake the second tray.
Once the first silpat-lined tray is free, place the cutting board cookies on this tray and chill. Using the leftover dough and plenty of flour, create your final 8 cookies. If you can create more, good on you. There's that insurance we talked about. Bake the third tray.
Your fourth batch, of course, uses the silpat from the cutting board and the second baking tray.
With any leftover dough, roll into small spheres. Press them into flattened cookies or shape them into little bowls filled with jelly. These will probably be thicker than 4 mm, so give them a nice long bake.
While the cookies are cooling, color and thin your icing.
Because these cookies are large, they'll need around 14 minutes of baking time. Bake the first tray of 6 pumpkin cookies and let them rest for at least 5 minutes on the baking tray before transferring them to a cooling rack.
While the first tray is baking and cooling, remove the second half of the cookie dough from the fridge and create a second silpat-lined tray of 6 cookies with 2 more for the cutting board. Gather the leftover dough and add it to the plate in the freezer. Bake the second tray.
Once the first silpat-lined tray is free, place the cutting board cookies on this tray and chill. Using the leftover dough and plenty of flour, create your final 8 cookies. If you can create more, good on you. There's that insurance we talked about. Bake the third tray.
Your fourth batch, of course, uses the silpat from the cutting board and the second baking tray.
With any leftover dough, roll into small spheres. Press them into flattened cookies or shape them into little bowls filled with jelly. These will probably be thicker than 4 mm, so give them a nice long bake.
While the cookies are cooling, color and thin your icing.
At last, it's time to decorate. You will need your icing, piping bottles and tips, a scribe tool, a paint brush, a leaf piping tip, a piping bag, two dozen cooled cookies, and a plan. Here's the plan.
Perform each step to all 24 cookies before moving on to the next.
Your finished cookie will have the face from the middle diagram.
Perform each step to all 24 cookies before moving on to the next.
Your finished cookie will have the face from the middle diagram.
Step 1: Pipe and brush a thick layer of yellow where the face will be.


Although this cookie cutter was designed to produce three or five sections, I think four works a little better with my design. We'll label them 1, 2, 3, and 4 from left to right. The middle diagram shows the face we'll be piping, and the diagram on the right shows the teeth and pupils filled in.
Step 2: Pipe section 1, smooth with the scribe tool, and pipe in the white shine.
Use the scribe tool to help shape and dot the bottom of the shine.Pipe section 3 from the middle diagram and smooth with the scribe tool.
Step 3: Pipe sections 2 and 4 from the middle diagram and smooth with the scribe tool.
Step 4: Pipe pupils and teeth. Use the scribe tool to help place small shines.


Step 5: With your piping icing, make three green lines on the stem from the left diagram.
Step 6: Fill in the remainder of the stem.
Step 7: Switch the tip to size 3 and pipe vines.
Step 8: With the piping bag, make small leaves along the vine to finish your cookies!


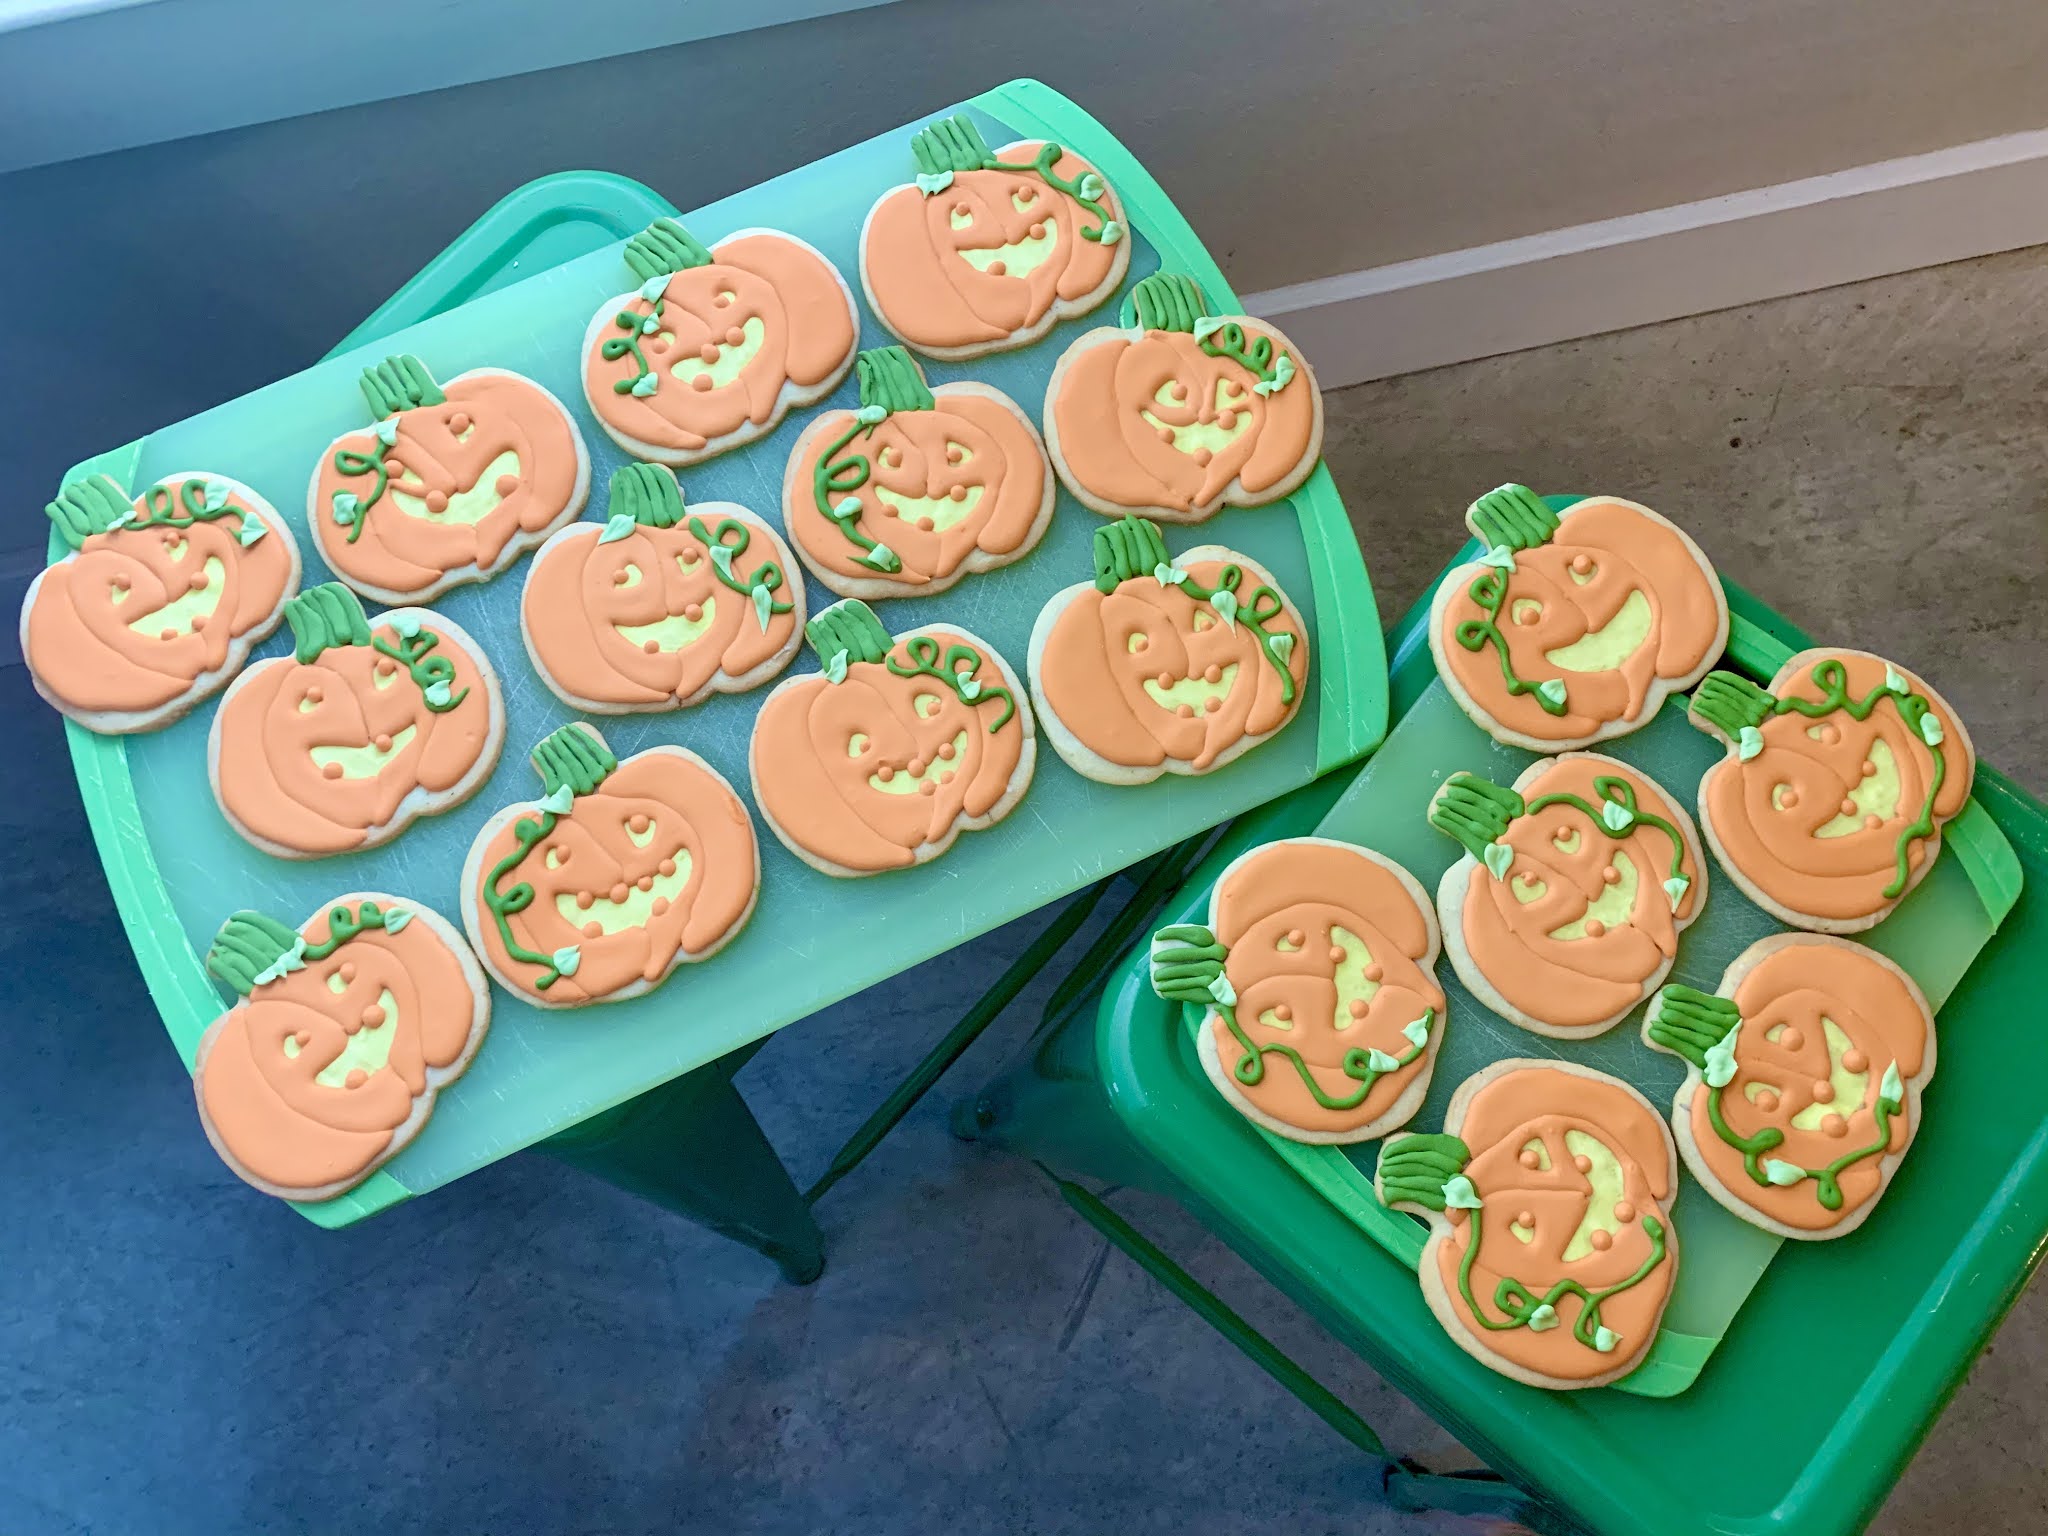
Smaller Simplified Practice Set
09 Oct 20
Update: By the time it was Milli's birthday, I had gotten distracted and made stenciled royal icing cookies and pumpkin profiteroles instead.